Pages

Sunday, 22 February 2015

Broken CD - Beautiful Vase

I have tons of CDs which no longer work or are useless. But I don't like to throw them. That shiny surface always holds me back when I want to put them in the bin. So here's what I did with them when my olive oil got over and I had a beautiful green bottle at my disposal.

Step 1: With pliers remove the rings that are surround the rim of the bottle and any other unwanted parts.

Step 2: Thoroughly clean the bottle and the CDs (of course without damaging the shiny surface) to get rid of any dirt or oil. They dry them well.

Step 3: wrap the CDs in a cloth and use a hammer to break them. I used two CDs. The cloth will prevent the pieces from flying and collect in the cloth.

Step 4: Smear one side of the bottle with glue.(I had a square shaped bottle. You can do part by part on a round bottle so the glue does not dry out. Use a strong glue for a lasting product.)

Step 5: Now choose the pieces of broken CD and place them on the glue with shiny side up in a mosaic form. You can play with shapes and sizes so they look different and individual.

Step 6: Keep them to dry and make sure the pieces stay where you have glued them.(keep the bottle on it's side to prevent the mosaic from slide off,out of pattern.

Step 7: Wipe your bottle with a soft cloth to remove any glue sitting on top of the CD pieces and bring back the shine of your bottle.

Step 8: With a ribbon or a thread cover the rim so the groves in the bottle are covered.

Step 9: Place a nice bouquet in the bottle.

Step 10: Admire your creation, your very own CD bottle.

These bottles are easy to make, hardly cost any money and will keep your house nice and beautiful.Why not try some other things that you should keep in like a tiny light or a candle? or maybe change the shape of your container!

Wednesday, 18 February 2015

Kid's Collage 2

Its those times when kids have holidays and no one to play with and to make things more worse, you are left alone with them for extended periods of time. What do you do to keep them engaged so that you can complete your household work before playing with them? Its just that little extra time you need.
When my kid was young, I used this trick to keep him engaged. It not only helped pass time but also helped him improve his creativity. All I did was very simple. I took some colorful papers and cut different shapes out of them like triangles, circles, small strips, thick and thin strips, etc. Gave him one A4 plain sheet of paper with a glue stick and asked him to create designs using those paper clips. He could create anything real or imaginary limited only to his imagination. You never know what they may create...We may stumble upon some master artist...

This is what my son came up with during one such session.


I used his talent and coaxed him into creating one very beautiful collage with a combination of plain paper cuttings and magazine cuttings. This time he imagined the picture and asked for images. He also did use the scraps lying around. I had to make him do it a few times before I was satisfied. I sent this creation to a competition held by Ryan Global School, Mumbai and guess what, his creation won the first prize for kid's under 5!


The first image won the prize. But we did not get the art back. So we had create another one on similar lines to display in his school.

Monday, 2 February 2015

Warli Wall Deco

When we shifted to our new home, we had to buy new items like washing machine, fridge, etc to get started. I had saved up the large packaging materials of polystyrene (thermocol) for later use. The material that came up with the washing machine was quite big and looked good. 

In after Christmas sales, I bought disposable table cloth at throwaway prices. I pasted it on top of the polystyrene sheet to make it look even. But this created a problem, The table cloth was not suitable for painting! So I took some cereal box cardboard and drew the Warli pictures on them, cut them out and painted them with two coats of metallic color.

I used a combination of string art and Warli cutouts to create this wall decor. This work was much appreciated and also won first place in my son's school for recycling project.


Wednesday, 7 January 2015

Healthy Food Collage 1

When you have young kids at home, it is always good to be prepared for the crazy home works they are given at school. I call them crazy because sometimes kids don't know what to do and sometimes it is so difficult to get raw materials to complete the work. Yes of course in this world of internet, it is very easy to find an image and take a printout. But that may not be possible always. So the best is to collect colourful pictures and images from news papers, magazines, etc as and when they catch your eye. Do not stick to any particular topic, just cut off anything that is clear and looks useful like famous personalities, animals, flowers, fruits, tech gadgets, good looking words, etc. This way you will save a lot of time and also cash. You save on your printer ink and paper and also in some cases on the posters or stickers you buy from shops. And not to forget this is eco friendly!

My son was given a homework to make two posters one for healthy food and one for junk food. As I already had my paper cuttings, I just had to sort them out. My son made the junk food poster and I made the healthy one. 
I had a lot of healthy food cuttings. So i tried something new. I arranged them in the form of a face and made this collage. This is one of my all time favourites!


Healthy Food Smiling Face

Thursday, 18 December 2014

Re-purposed Jeans...

We buy so many things on instinct. Sometimes we realize later that we really did not like what we bought but then we simply cannot return it for some reason. What to do? Charity, Bin or make it likable? I chose the third one and my son took it to an all new level.

Once I went to a store where most of the items were on sale - I don't mean half price sale....I mean a much much greater envious sale. In those racks of sale items, I found this branded pair of jeans at a cost I never expected. I am not an instinctive buyer, but I couldn't resist this one. So I bought it without reading the full label - SALE ITEM NON-RETURNABLE. At home, I realized it was bootleg, something which I did not like much. I still tried to wear it, but nothing made me happier, not even the price I had paid for it. How could I possibly throw such a good quality item? I had to do something.

That is when the summer season came to my rescue. An idea struck me and I came home and cut the legs to make them short and viola! I had a new pair of jeans which was so comfortable and looked so nice. I only had to stitch the edge to seal off the threads, but I thought of another idea and instead of the regular stitch, I used croshay. It gave a new designer look to my jeans.


When my son came home from school, I showed him my work as I always do. He was delighted but was more interested in the cut out cloth pieces. He asked me if he could use them, which I gladly agreed to. After all what use would I put those discarded pieces to?

He took them and went away to his room saying "Private Time." It simply means I am not allowed into his room! He came out after a long time with the cloth in his hand but now it was not a mere piece of cloth, it had turned into a pouch, a pouch with pockets.It did miss the handle though. But it was a beautiful idea. I was amazed. I keep telling him all the time "Son you are more creative than me." But he never agrees.

Well since this was done about two years ago, I only have the finished product. So I have taken help of some image editing to show how it was done.

Step 1:

After the piece was separated from the main cloth, it was stitched inside out on the line shown below. This side was chosen because the end of the jeans always has a fine finished hem. So a lot of work is reduced and it also looks neater.

Step 2:

One leg piece was used as the main piece. The other piece was cut into a square shape and sewn on to the inside of the bag as shown below in blue line. This made two compartments in the bag. Being an 8 year old, my son had done his best to make the stitches as neat as possible.

Step 3:

Now turning the bag inside out, He stitched a small pocket on the outside. Here again he used the hem of the jeans to save labor. He took my advice on this since he did not know how to hide the ugly edges from peeking out. I also helped him in stitching since it was too thick to poke the needle in at some places. I later added some embroidery to make it look more attractive.

Step 4:

His part was finished. Now it was my turn to add one long handle and something to close its mouth. I looked for spare zips but did not find any suitable one. I added one temporary handle and started using it because I couldn't wait to show off to my friends! I took the bag to India where my Dad found a suitable zip and attached to it on his sewing machine. I am not so good at that.

Step 5:

I found a satin ribbon and some white thick flat string at home. I thought of making the bag handle with it but was struggling to make a good design. The red zip on the bag matched with the red satin ribbon. So I wanted that to be used.Here again my son did a wonderful job. He started winding the red ribbon around  the white string with in an infinite loop fashion. My bag handle was taking a beautiful shape. It looked lovely. More beautiful than I could imagine. 

Step 6:

I simply attached the ends of my new handle to the bag to complete it.

Now I have a matching bag for my jeans.And it looks awesome.

Wednesday, 10 December 2014

Key Holder

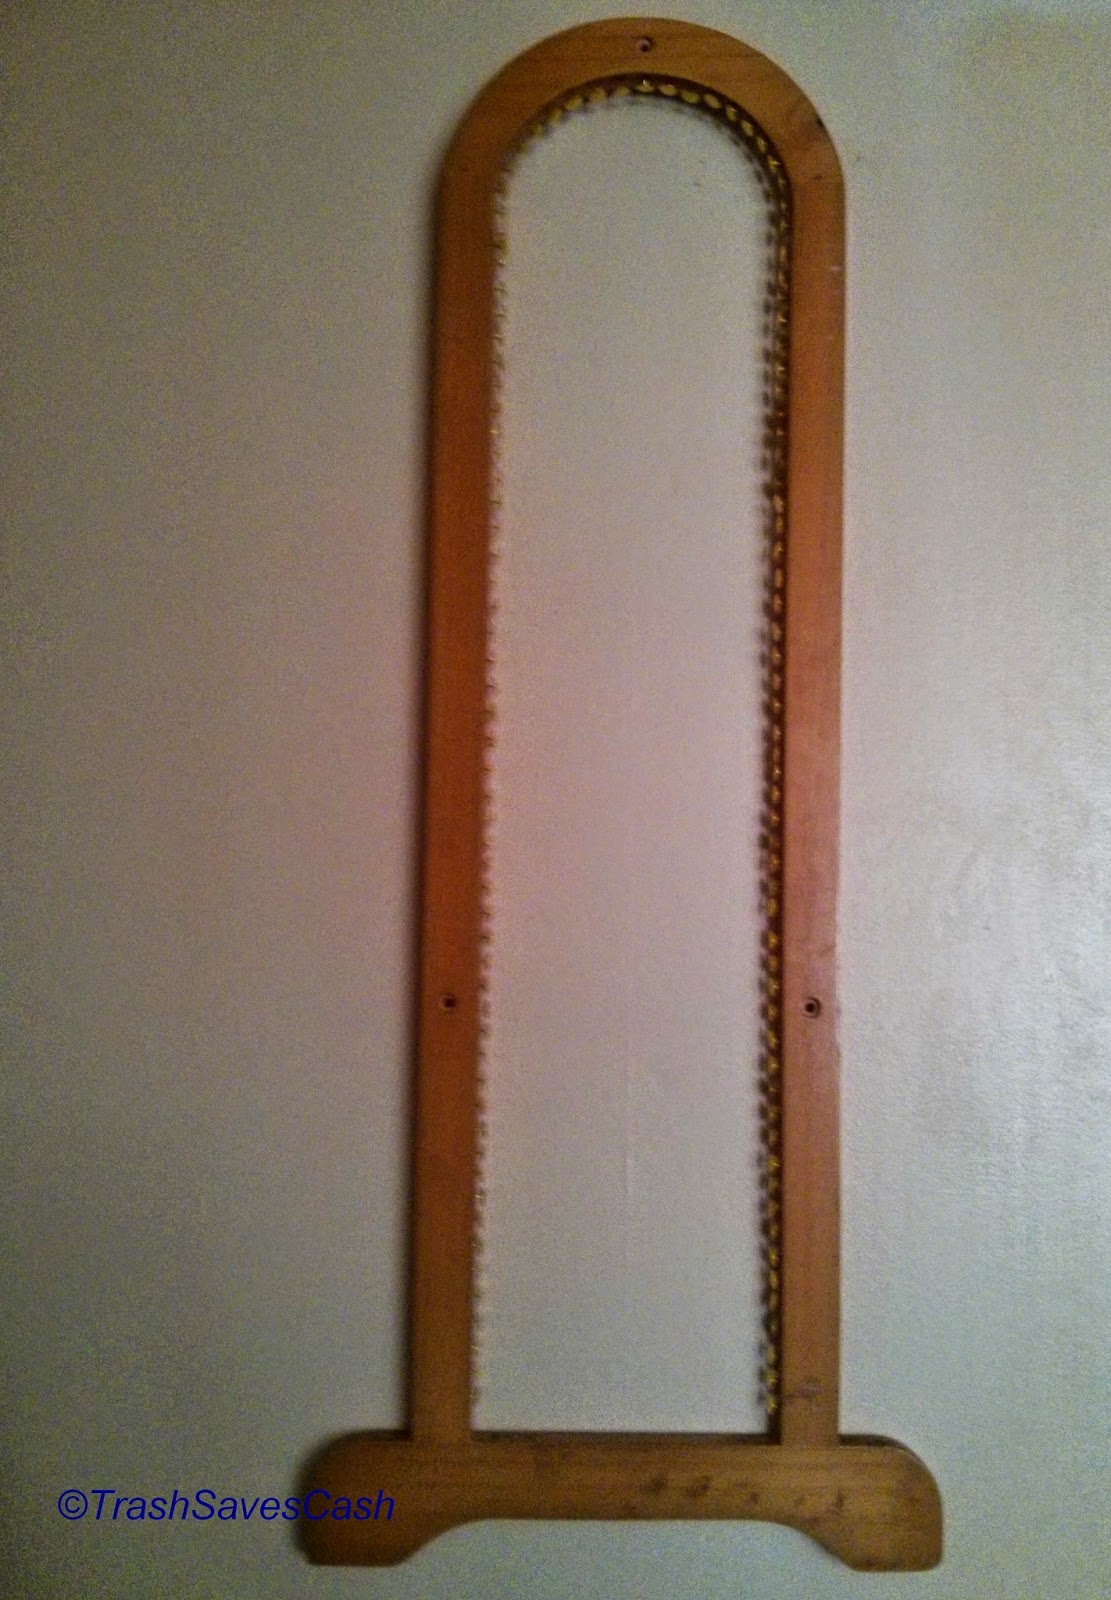
What would you do if your wooden towel stand came apart and all you are left with are the two end parts of the stand? Well when I faced this question, I just kept them in a corner for few days. They then started troubling me because my young son would play with them and throw them here and there. So I just hung them on the wall. They stayed there for a few more days.In the meantime, I had problems keeping my keys and every time I saw this frame hung on the wall, I thought, how can I use this.
One end of the stand.
One day I took the frame down and sat staring at it for a long time. I felt that the wood was soft, soft enough to press pins into it by hand.So I took some drawing pins and pushed them in on the inner side of the frame. It went in quite easily. Then I took the box of pins and started pushing one pin after the other into the soft wood. Seriously I did not count them, I just tried to keep a constant distance between them. This is the problem with me! I work on instincts. Some were quite difficult to push, but ultimately I had completed and it did look beautiful.

The next part was the most difficult. I had to pull the thread through these pins without getting the pins out. Not too tight and not too loose. Also the string did not stay in place many times.

The pattern I used to make design:

 I counted the pins into two sections and found the mid point. Then tied knot on the first pin, pulled the string all the way around the middle pin and back to the pin next to the first. Then to the second pin on to the right of the middle pin and back to the third pin from where I began and so on till I reached the last pin. At the end I saw a beautiful pattern. 
Make sure the thread is securely in place and does not slip out of the pin. The tension on the strings should be equal everywhere otherwise the pattern will not look good.
I used the same technique for the bottom part with six on each side and eleven pins the bottom line.
At last when all was done, I fixed some store bought hooks to the frame to hang the keys.
I loved the end result. Nobody could say it was home made.


Monday, 8 December 2014

Kitchen apron from old dress

Hello there,

My newest creation - A kitchen apron from my old dress.

I needed a kitchen apron and definitely did not intend to buy one from the stores. Every time I held one in my hand and saw the price on it, I would think - why should I shell out so much for this small piece of cloth? When I was clearing out my cupboard, I found this dress which had yellow stains on sleeves and front. It was as good as not usable. So this is what I converted it into...
 
From this...                                                                       ......To this

The first thing I did was to cut off the collar, sleeves and the front portion.I had an advantage that it had long sleeves which could be used to make the belt for tying.I used the back portion of the dress to make my apron as it was clean, spotless and also had no buttons.
Sleeves gone!

Front and back still joined together due to the collar

After getting rid of all unwanted portions of the dress.
A closer view of the neck after trimming into shape.
I then stitched the entire border covering it up with a blue ribbon.


It looked brand new after this:-)
I cut the sleeves into three long strips and joined them together to make one ribbon long enough to go around my waist with extra to tie up.
 Stitched the entire border to make it look nice and neat.

I also used the end part of the sleeve and the buttons to make the top part of the apron. Just added two more buttons to vary the size as required. Everything else came ready-made with the dress!
It was important to cover the elastic on the waist. So my belt was wide enough to cover it up properly. My apron is all done. But it looked very plain. So here comes the decoration bit...

Two hearts one inside the other drawn and then embroidered with lovely red. I also embroidered an apple, a banana and a strawberry on the belt.
The end result looked something like this after a good wash and iron to erase all the pen marks...


Friday, 21 November 2014

Lord Ganesha...

Vakratunda Mahakaya sooryakoti samaprabha
Nirvighnam kurume deva sarva karyeshu sarvada||

I begin my blog with a prayer to Lord Ganesha to help me do my work well.

Well this is a simple painting of Lord Ganesha done on a piece of cloth and then framed. It now adorns my home main door blessing all those who enter that door.

Back in time when I was a kid, may be about 6-7 years old, someone had given a cloth calender to my mum. I remember it was a saffron color one with this picture in black. My elder sister liked it a lot. She thought it will look better with all the ornaments painted in gold. So it was originally her idea, not mine! She painted the ornaments in Gold leaving all the black lines intact. A very difficult work for school going kids. It looked beautiful and adorned our wall for quite a few years. But with time, it eventually was removed and kept in a trunk.

It was always on my mind to redo that. So once I got a chance to sneak it and take it with me to my hostel. I also took a white piece of cloth with me. I traced the design and outlined it with black and gave Ganesha a lot of Gold ornaments just like my sister. I then got it framed and presented it as a surprise gift to my parents on my next visit. I can still remember the delighted look on my mum's face.

This happened back in the year 2001. So it has been in its place from that time blessing all of us.