Pages

Friday 27 March 2020

Toy Car

When someone talks about toy cars made of cardboard, the first picture that comes to mind is a simple, small car that can be held in hand or kept in a showcase. But this one is different. 


This car was made from a single rectangular cardboard box.

Cut open the bottom side of the box and save the pieces for making the wheels. Now open the top side lids and and trim the edges in such a way that the adjacent edges can be glued to make the upper body of the car. Now cut out the windows, front and back of the car. You could glue in some transparent plastic sheet to give the illusion of glass.

To make the wheels, cut 8 circles from the remaining cardboard pieces. Also cut 4 strips long enough to cover the circumference of the circle. Now glue the strip around two circles. I put all the small scrap cardboard pieces in between the two circle to give the wheels some strength.
Glue the wheels to the body.

Give a nice coat of paint to your car and voila, ready to go on a long drive!!!

Saturday 9 July 2016

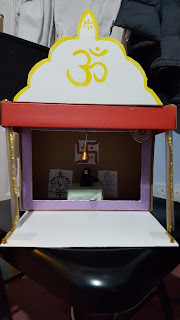
Mandir assignment

Have you ever got a problem where your child comes to you and asks ideas for a mandir assignment as a homework from school. well i put my mother in that same shoes.to to resolve your problem i have this to help you and your little one.

stuff you will need:

glue(pva)
cardboard
shoe box
jumbo straws
pipe cleaners
scissors
paper
golden paint
god print on paper

Instructions:

1)open your box and put the lid on the side of the box.it should be a snug fit. this side will be the roof of the mandir. not to make sure it is sealed well and wont come off take the lid off and apply glue and put it back on.

2) take a flat piece of card and glue it to the bottom of the mandir. now you have your roof and your floor done.

3) it still looks strange as the roof is floating so grab a straw and put a pipe cleaner through it.then make holes on the roof and the floor and with the pipe cleaner sticking out the straw thread it through the hole on both the roof and floor. that makes your pillars.

4) about now your mandir should be taking shape so to make it look more and more like a mandir you need a dome sort on the top. so to do so take a piece of card and cut out a cross. bend too ends on each other and the others to cut so it looks like a pointed edge and stick on the side.


5) give it a paint job! that is all that remains. make it look beautiful and gorgeous 

6) and paste your gods in side you are done!


Friday 8 April 2016


Happy Ugadi!!!


before I start I want to dedicate this post to my maama(Uncle) because it is his birthday and he has helped me and inspired me to be who I am and to honor him.


Night-cloud-light. A night light that you will be proud to say you made. this neat and simple trick will put your children to sleep by its nice and wonderful light. to make this you will need to have an empty plastic bottle. First make sure that your bottle is clean and not sticky.

Grab some cotton or wool and start to strip away until you find small workable pieces. This will help in the future when gluing the cotton to the bottle. Anyway make sure you have some sort of glue which is strong enough to hold the cotton. You can use hot-glue, pva glue and any other which is not a glue stick! Take one of the cotton pieces and squirt a rough area of the bottle in glue and stick the cotton like paper mache; except with cotton. Repeat until the bottle is covered everywhere but make sure the cotton is as uneven as possible. Now you need to take the cloud and wrap it in a plastic thread or a fishing line. This prevents the cotton from coming off. At the end the transparent thread should loop around the bottle holding it up in the air. If you stuff the cloud with christmas lights (through the mouth of the bottle) it will light up and if you put coloured or colour changing lights then you will have an interesting and awesome cloud.

So this is your awesome cloud done and I hope your children will love it and it will put your children straight to sleep.

Thursday 18 February 2016

Tissue Roll Lampshade

Another up-cycling project. I have seen many crafts made with toilet paper roll. But I haven't found anything like this.

I love quilling and if you see on my favourites page, you can see a quilled lampshade I made. But that is made with paper.

Once when I was having these numerous rolls of cardboard in front of me and I was thinking what to do with them, an idea struck to me. I tried quilling with them. Though the designs did not look delicate, they did look beautiful. So I continued to make a pattern. I agree that it was a bit difficult to hold the pieces in shape and place. So I used cloth pegs to hold them tight until the glue dried completely making the shape permanent.

I did not have any predesigned pattern in mind. I just followed my instincts and gave shape to this lampshade. I stopped when I felt the size was appropriate. I let it dry well and also tied a thin thread to hold it in place in case!!!! as I wasn't sure it would be strong.

But believe me, it turned out very well. I was wrong. It is strong and very good looking. It looks beautiful and currently adorns my son's room!

Here take a look at it....

Tuesday 15 December 2015

Paper Clutch

A perfect gift for that special someone...

Another idea to up-cycle newspaper. I found this on YouTube and was impressed.  I had my own ideas but was doubtful if my idea would work. I had already failed one attempt!!!

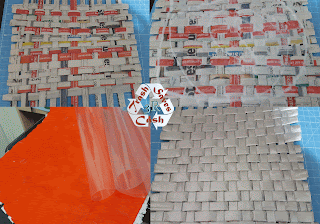
Well this one is fairly simple. Only time needed is to make paper rolls and the time for the glue to dry. Make paper rolls. You will need as many according to the size of your purse. I used about 30. Also it will be better to have a standard paper size and something to roll on to keep all rolls same. I used half news paper for each roll and a thin curtain rod to roll on. Then stick the edges so the roll remains intact.

Weave the rolls like a mat as per required size. Apply glue on one side and stick a cloth of same size. On the other side, which will form the main face of the clutch,  I used spray paint.


Once everything was dry, I trimmed the edges, put OHP sheet over the entire area and covered the edges with thick paper. I used nail Polish on the border. You could use any waterproof paint. Then I folded the paper mat into my desired shape. After sometime, the shape stays in place. I sewed the two endsides with thread to hold them in place and also added some beads on the outside to make it look decorative and give space to put hand to retrieve things. Then I closed both the open edges on the sides with more pieces of OHP sheets to join the edges and avoid things falling off.


I then sewed a button at the front and covered with decorative sticker. The last bit was adding a thread to keep the clutch closed. Instead on making a loop in the thread, I used the mechanism of going around the button once.


This can be a beautiful up cycled gift made with love for the person and care for Mother Earth!

Thursday 10 December 2015

Wall Decor

When Christmas arrives, though it brings festivity and cheer all around, it also brings expenses in the form of gifts. So over next few days, I thought I will share some of my festive ideas that not only look good and elegant but also save some hard earned cash.
The below wall decor was made as a present. It turned out so well that you could not identify what it was made of even after holding it in your hands!

The frame was completely made of newspaper rolls. I had four thick and long rolls of news paper and another slightly smaller and thinner ones.

These were then given one layer of white paper coating so that the paint looked good. This final paper was glued very neatly to give a smooth finish. Then all of them were painted in metallic brown.

Once everything was dry, I arranged them in the fashion pictured and glued them in place. Then I tied white string at the joints to give an antique look.  The hanging loop is also made of the same string.

My son then made a Warli painting on a piece of paper as per the small central space and we stuck it in place to complete the wall decor.

The frame was very strong and lasted for years!

This can be an ideal gift for art lovers.


Saturday 28 November 2015

Quilled Card

Its been a week since the birthday of my blog. So here's a card wishing my blog a very happy birthday.

Since Christmas is only a few weeks away....its almost there, I thought of giving some DIY ideas for Christmas gifts. This is the first one of them. Its a Birthday card, but can be changed to any occasion!

How I made this card:


I made some quilling shapes out of paper. Tutorials for making these can be found in abundance on the internet. So I am not going into details of that. I had very limited supply of materials, so I used whatever I had. I had made these quilling shapes sometime ago. All I needed was to arrange them in some beautiful pattern. I modified the centre white one to make a beautiful butterfly. Added some detailing with a black marker and added two antennas.
The flower had a big hole in the centre which I did not like. So I added an yellow bead and it looked fabulous.
After glueing the flower and butterfly on to the card, There was still some space at the bottom. I like the size and shape of the card and did not want to change it. But I did not have any more quilled shapes and also did not want to spoil the design I had made.
I had a wrapping paper from some gift my son had received on his birthday. It had "HAPPY BIRTHDAY" printed all over. I cut one of them in rectangular shape and it fitted my card exactly! The card looked beautiful too. So this completed my card.

Envelope:


Now my card was ready but it had no envelope. The standard A4 sheet was too small to make one for the card. So I decided to add some colour to it. I took the pink sheet of paper I had used for quilling the flower and cut it into two stripes. I then glued one on each side of my A4 sheet. Now I had a bigger paper which could make a bigger envelope for my odd sized card.
My envelope matched and looked very beautiful with the card in it.


Thursday 22 October 2015

Happy Dussehra...

Happy Dussehra to all of you.


Today along with celebrating the victory of Good over Evil, I also celebrate people who are real fighters. Those people who fight the problems in their life and emerge as heroes, each one in their own unique way!!!

Some fight for their independence, some for their rights. But there are some who fight against the deadly diseases like cancer which crawl in without notice. But mind you my heroes are those who do not give up. Even if everyday is a struggle, even if every minute is painful, they endure it with a smile that never leaves their lips. These people are an inspiration to all of us. They touch our lives in a very special way. But alas! some lose their fight. They are still heroes. Winning a battle is not a measure but the resistance you have to give up is. These give us the message that 'Life is a gift. Enjoy it while it is with you. It may be snatched from you before you realise.'
Today I pay tribute to my friend who recently lost her life to cancer. Her magnetic smile will always be with me.

Today I celebrate the life of all those people who in spite of their everyday struggle, strive hard to live life to the full and inspire us. I am lucky to work closely with one such lovely lady. She had a life changing event when she had a stroke. Everything that was simple, suddenly turned into a strenuous and gargantuan tasks. But she has not given up. Today she is learning new skills. Her speech impairment and mobility problems which were a result of the massive stroke she had have failed to take over her spirit. They always will. She is a pleasure to be around. She is now learning to blog her experiences so that other people find it helpful.

You may reach her blog by clicking on the following link:
http://survivorafterstroke.blogspot.co.uk

Do visit her blog and let her know how much her work is appreciated.